Monday, January 17, 2011

Selenium IDE Recording Option

Selenium IDE Recording Option

Many firts-time users begin by recording a test case from their interactions with a website. When Selenium-IDE is first opened, the record button is ON by default.

Figure: Selenium "Record" button
 This can be set to OFF as a default with an avilable user extension.

To set OFF follow the below steps.
  1. In Selenium IDE, click on "Options" menu
  2. Select "Options..."
  3. In "General" of "Selenium IDE Options" window, un-check "Start recording immediately on open" check-box
  4. Click on "OK" button.
  5. Close the "Selenium IDE"
  6. Re-start the Firefox
When you open "Selenium-IDE" the record button will be OFF.

Monday, January 10, 2011

JUnit Annotation Type - RunWith

7. Annotation Type RunWith:  

When a class is annotated with @RunWith to extends a class annotated with @RunWith, JUnit will invoke the class it references to run the tests in the class instead of the runner built into JUnit. For example, suites in the JUnit 4 are built using RunWith, and a custom runner names Suite:

@RunWith(Suite.class)
@SuiteClasses(ATest.class, BTest.class, CTest.class)
public class ABCSuite{
}

Class Parametrized:

The custom runner Parameterized implements parameterized tests. When running a parameterized test class, instances are created for the class-product of the test methods and test data elements.

Junit Parameterized Test is new feature invoked in JUnit4, it means vary parameter value for unit test. In fact some method have many difference parameters value to input, if you write a testcase for per parameter value, this could be quite large numbers of test case you need to code in Junit, which has supported class Parameterized as for Parameterized Test function, use @RunWith annotate Parameterized as this test class runner, use @Parameters annotate method data() and it have to return List[], the parameter will pass into class constructor as argument.

Example:

Write the following JUnitTest in Eclipse.

import java.util.Arrays;
import java.unit.Collection;
import junit.framework.Assert;
import org.junit.Test;
import org.junit.runner.RunWith;
import org.junit.runners.Parameterized;
import org.junit.runners.Parameterized.Parameters;

 @RunWith(value = Parameterized.class)
public class JUnitTest extends Assert{

            String name;
            int age;

            public JUnit4Test(String name, int age){
                      this.name = name;
                      this.age = age;
            }

           @Parameters
           public static Collection<Object[]> data(){
                    object[][] data = new Object[]{{"Parameterized test1",       10},{"Parameterized test2", 20}};
                    return Arrays.asList(data);
           }

          @Test
          public void testOut(){
                   System.out.println(name + " " + age);
          }

Output:
Parameterized test1 10
Parameterized test2 20

JUnit Annotation Type - AfterClass

6. Annotation Type AfterClass:

If you allocate expensive external resources in a BeforeClass method you need to release them after all the tests in the class have run. Annotating a public static void method with @AfterClass causes that method to be run after all the tests in the class have been run. All @AfterClass methods are guaranteed to run even if a BeforeClass method throws exception. The @AfterClass method declared in superclasses will be run after those of the current class

Here is a simple example:
public class Example{
        DatabaseConnection database;
        @BeforeClass
         public static void login(){
                database = ...;
     
         @Test
         public void something(){
                ...
         }

        @Test
         public void somethingElse(){
               ...
         }

         @AfterClass
         public static void logout(){
                  database.logout();
         }
}

Example in Eclipse:

import java.util.Date;

public class Person2{

         private Date birthday;
         private String name;

         public Person2(String name, Date birthday){
                 this.name = name;
                 this.birthday = birthday;
          }

          public Person2(String name){
                 this.name = name;
           }

           public Date getBirthday(){
                  return birthday;
           }

           public void setBirthday(Date birthday){
                   this.birthday =  birthday;
           }

           public String getName(){
                    return name;
           }

           public void setName(String name){
                    this.name = name;
            }

           public int getAge(){
                   if(this.birthday == null return 0;
                   Date now = new Date();
                   return now.getYear() - this.birthday.getYear() + 1;
            }
}

Here is the test code which is used to test class Person2.

import org.junit.*;
import java.util.Date;
import java.text.SimpleDateFormat;

public class Person2Test extends Assert{
         public static SimpleDateFormat df;
         private Person2 person2;

         @BeforeClass
         public static void BeforeClass(){
                  df = new SimpleDateFormat("yyyy-mm-dd");
                  System.out.println("BeforeClass");
         }

         @Before
         public static void setUp() throws Exception{
                  Date date = df.parse("2010-10-14");
                  Person2 = new Person2("Jimmy", date);
                  System.out.println("setUp");
        }

        @Test
         public void getAge(){
                  assertEquals(person2.getAge(), 6);

                  System.out.println("Test getAge");
        }

       @Test
         public void getName(){
                  assertEquals(person2.getName(), "Jimmy");


                  System.out.println("Test getName");
        }

        @After
         public void tearDown() throws Exception{
                  person2 = null;

                  System.out.println("tearDown");
        }


        @AfterClass
         public static void BeforeClass(){
                  df = null;
                  System.out.println("AfterClass");
         }
}

JUnit Annotation Type - BeforeClass

5. Annotation Type BeforeClass:  

Sometimes several tests need to share computationally expensive setup (like logging into a database), While this can compromise the independence of tests, sometimes it is a necessary optimization. Annotating a public static void no-arg method with @Before causes it to be run once before any of the test methods in the class. The @BeforeClass methods of superclasses will be run before those the current class.

For example:

public class Example{
         @BeforeClass public static void onlyOnce(){
            ...
          }

          @Test public void one(){
            ...
          }
     
          @Test public void two(){
            ...
          }
}

JUnit Annotation Type - After

4. Annotation Type After:

If you allocate external resources in a Before method you need to release them after the test runs. Annotating a public void method with @After causes that method to be run after the Test method. All @After methods are guaranteed to run even if a Before or Test method throws an exception. The @After methods declared in superclasses will be run after those of the current class.

Here is a simple example:

public class Example{
         File output;
         @Before public void createOutputFile(){
                     output = new File(...);
          }

         @Test public void something(){
                   ...
          }

         @After public void deleteOutputFile(){
                 output.delete();
          }
}

Example in Eclipse:

Create the class called Person in eclipse.

package test;

public class Person
{
       private String name;
    
       public Person(String name)
       {
             this.name = name;
       }

      public String getName()
      {
           return name;
      }
}

Here is the test cose which is used to test Person class.

package test;

import static org.junit.Assert.*;
import org.junit.After;
import org.junit.Before;
import org.junit.Test;

public class PersonTest
{
        private Person person;

       @Before
       public void setUp() throws Exception{
               person = new Person("Jimmy");
               System.out.println("setUp");
       }

      @Test
       public void getName(){
                assertEquals(person.getName(), "Jimmy");
                System.out.println("Test getName");
       }

      @After
      public void tearDown() throws Exception{
               person = null;
               System.out.println("tearDown");
     }
}

Output:
setUp
Test getName
tearDown

JUnit Annotation Type - Before

3. Annotation Type Before: 

When writing tests, it is common to find that several tests need similar object created before they can run. Annotating a public void method with @Before causes that method to be run before the Test method. The @Before methods of superclasses will be run before those of the current class.

Here is a simple example:


public class Example{
       List empty;
       @Before
        public void initialize(){
               empty = new ArrayList();
         }
         @Test public void size(){
             ...
         }
          @Test public void remove(){
             ...
        }
}

JUnit Annotation Type - Ignore

2. Annotation Type Ignore:

Sometimes you want to temporarily disable a test or a group of tests. Methods annotated with Test that are also annotated with @Ignore will not be executed as tests. Also you can annotate a class containing test methods with @Ignore and none of the containing tests will be executed. Native JUnit 4 test runners should report the number of ignored tests along with the number of tests that ran and number of tests that failed.

For example:

@Ignore @Test public void something(){ ...

@Ignore takes an optional default parameter if you want to record why a test is being ignored.

@Ignore("not ready yet") @Test public void something() { ...

@Ignore can also be applied to the test class.
                 @Ignore public class IgnoreMe{
                             @Test public void test1(){....}
                             @Test public void test2(){....}
                  }

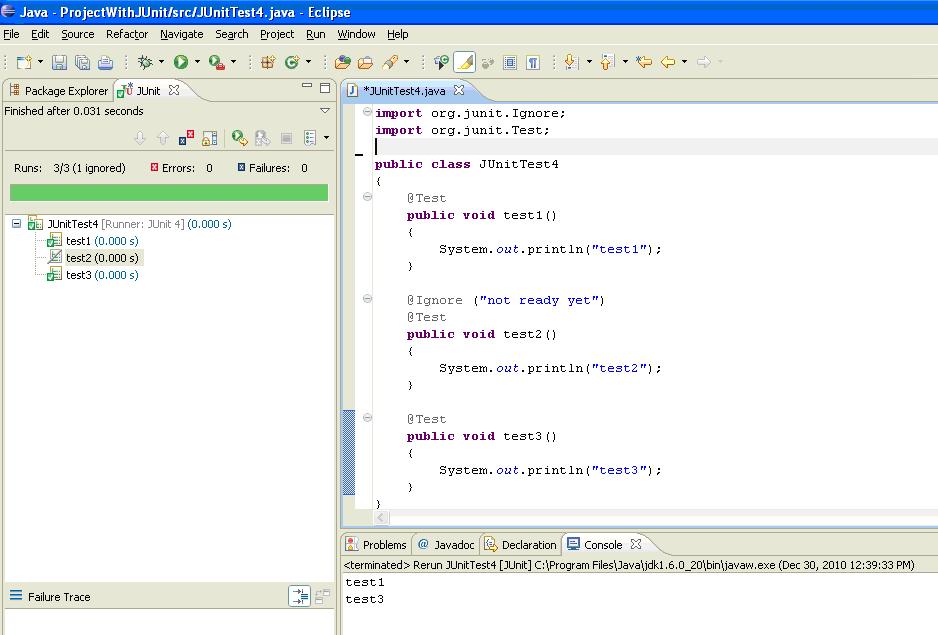
Example: Create a following class in Eclipse and name it as JUnitTest4

import org.junit.Ignore;
import org.junit.Test;

public class JUnitTest4
{
       @Test
       public void test1()
       {
              System.out.println("test1");
       }

       @Ignore("not ready yet")
       @Test
       public void test2()
       {
              System.out.println("test2");
       }

       @Test
       public void test3()
       {
              System.out.println("test3");
       }
}

Right click within the test method area and choose "Run As - JUnit Test"

Figure: Example for JUnit @Ignore annotation

JUnit Annotation Type - Test

1. Annotation Type Test

The Test annotation tells JUnit that the public void methos to which it is attached can be run as a test case. To run the method, JUnit first constructs a fresh instance of the class then invokes the annotated method. Any exceptions thrown by the test will be reported by JUnit as failure. If no expectations are thrown, the test is assumed to have succeeded.

A simple test looks like this:

public class Example{
        @Test
         public void method(){
                org.junit.Assert.assertTrue(new ArrayList().isEmpty());
          }
}

Example in Eclipse IDE:

1. Open your Eclipse IDE.
2. Add a new class to the test project
3. If needed please import the Junit library to your currect project decency libraries.
4. Write a class named SimpleTest and extend junit.framework.TestCase (actually if you Junit4, you don't need extend junit.framework.TestCase)
5. Write a test method and asserting desired result. You can use annotation "@Test" to declare this method is test method.

Figure: Example for JUnit @Test annotation


Right click within the test method area and choose "Run As - JUnit Test"

Test annotation with optional parameters:

The Test annotation supports two optional parameters:

a. expected
b. timeout

1.1 Test annotation with 'expected' optional parameter:

The first, expected, declared that a test method should throws an exception. If it doesn't throw an exception or it it throws a different exception that the one declared, the test fails. For example, the following test succeeds.

Example:

@Test(expected=IndexOutOFBoundsException.class)
public void outOfBounds(){
        new ArrayList<Object>().get(1);
}

Example in Eclipse:

Crate a following class in Eclipse IDE.

import org.junit.*;

public class JunitTest2
{
         @Test(expected = ArithmeticException.class)
          public void divisionWithException(){
          int i = 1/0;
          }
}

Right click within the test method area and choose "Run As - Junit Test"

Figure: Test annotation with expected parameter.
In the above example, the divisionWithException() method will throw an ArithmeticException exception, since this is an expected excpetion, so the unit test will pass.

1.2 Test annotation with 'timeout' optional parameter:

The second optional parameter, timeout, causes a test to fail if it takes longer than a specified amount of clock time (measured in milliseconds). The following test fails.

Example:

Create a following class in Eclipse IDE and name it as JUnitTest3

import org.junit.Test;

public class JUnitTest3
{
       @Test(timeout=1000)
       public void infinity()
       {
               while(true)
       }
}

Right click within the test method area and choose "Run As - JUnit Test"

Figure: Test annotation with timeout parameter
In the above example, the infinity() method will throw an time out exception, and the test will fail.

Friday, January 7, 2011

Starting Selenium Server

Starting Selenium Server Method1:

1. Start -> Run. Open command prompt 

Figure: Command Prompt
2. Type java -jar

3. Drag the selenium-server.jar file from the directory it is located. (see the below figures)

Figure: Location of selenium-server.jar file
Figure: After Drag and drop to command prompt
4. Press Enter button

5. Now Selenium RC is ready and you can execute selenium test cases.

6. Your command prompt should look like this.

Figure: Selenium Server

Wednesday, January 5, 2011

Complete JUnit

Installing Selenium IDE

Installing Selenium IDE:

1. Open Firefox browser.

2. Goto http://seleniumhq.org/download/ site.

3. Click on "Download" link for Selenium IDE

Figure: Download Link for Selenium IDE
4. Firefox browser opens with a "Software Installation" page as shown in the following figure. Click on "Install" button

Figure: Selenium IDE Installation Page


5. Restart the Firefox browser.

6. After Firefox reboots you will find the Selenium-IDE listed under the Firefox Tools menu.

Opening the IDE

To open the Selenium IDE, click on "Tools" menu of the Firefox browser, click on "Selenium IDE"

It opens as follows with an empty script-editing window and a menu for loading or creating new test cases.

Figure: Selenium IDE


Tuesday, January 4, 2011

JUnit Annotations

JUnit Annotations:

An annotation, in the Java computer programming language, is a special form of syntactic metadata that can be added to Java source code. Classes, methods, variables, parameters and packages may be annotated.

Annotations provide data about a program that is not part of the program itself. They have no direct effect on the operation of the code they annotate.

Annotations have a number of uses, among them:
  • Information for the compiler - Annotations can be used by the compiler to detect errors or suppress warnings.
  • Compiler-time and deployment-time processing - Software tools can process annotation information to generate code, XML files and so forth.
  • Runtime processing - Some annotations are available to be examined at runtime.
Followings are the some of JUnit annotations which are quite useful:

1. Test
2. Ignore
3. Before
4. After
5. BeforeClass
6. AfterClass
7. RunWith

<<Previous  Next>>

Monday, January 3, 2011

JUnit Test Case with Eclipse IDE

Using JUnit With Eclipse IDE:

1. Run Eclipse IDE.

2. Create a new workspace project, click File -> New -> Project, then choose Java and click "Next" button. Type in a project name -- for example, ProjectWithJUnit

3. Click Finish. The new project will be generated in your Eclipse IDE.

4. Let's configure our Eclipse IDE, so it will add JUnit library to the build path. Click on Project->Properties, select Java Build Path, Libraries, clcik Add External JARs and browse to directory where your JUnit is stored. Pick junit.jar and click Open.

You will see that JUnit will appear on your screen in the list of libraries. By clicking Okay you will force Eclipse to rebuild all build paths.

We are ready to start developing our first Junit test "Hello World" in Eclipse IDE. We will write a Junit test cases for "HelloWorld" class.

5. Create a package called "com.blogshot.atozselenium". Right click on the src (source folder), select New -> Package. Name it as "com.blogshot.atozselenium"
6. To create a "HelloWorld" class, right click on the project "ProjectWithJunit" title, slect New -> Class. Enter the class name as HelloWorld. Click on "Finish" button.

7. Create a method called say() and save the java file.

public class HelloWorld{
    public String say(){
        return("Hello World");      
    }
}


Your Eclipse IDE HelloWorld class should look like this:

                      Figure: "HelloWorld" class in Eclipse IDE.

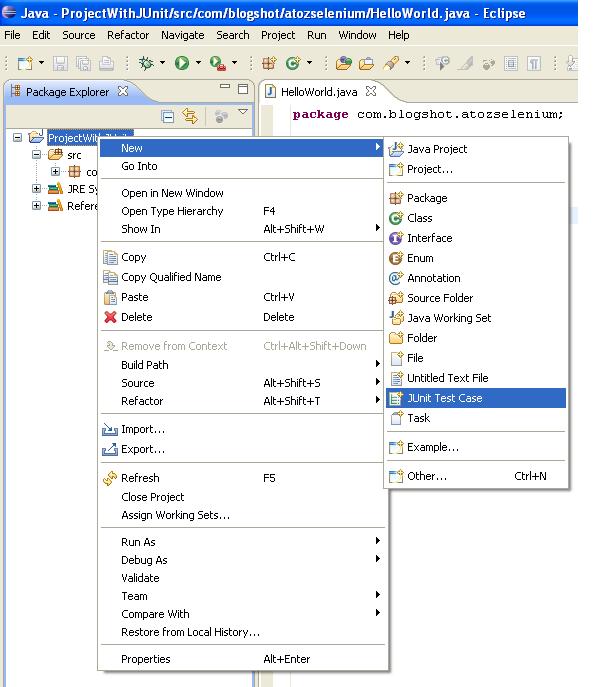
8.Create a JUnit Test Case.

a. Right click on the project
b. Select New -> JUnit Test Case.

Figure: Creating JUnit Test Case
c. In JUnit Test Case form, select Package, by clicking on the "Browse" button.
d. Enter name as TestHelloWorld
e. Click on "Finish" button

Figure: JUnit Test Case

9. Modify the JUnit Test Case as follows

package com.blogshot.atozselenium;

import junit.framework.TestCase;

public class TestHelloWorld extends TestCase{
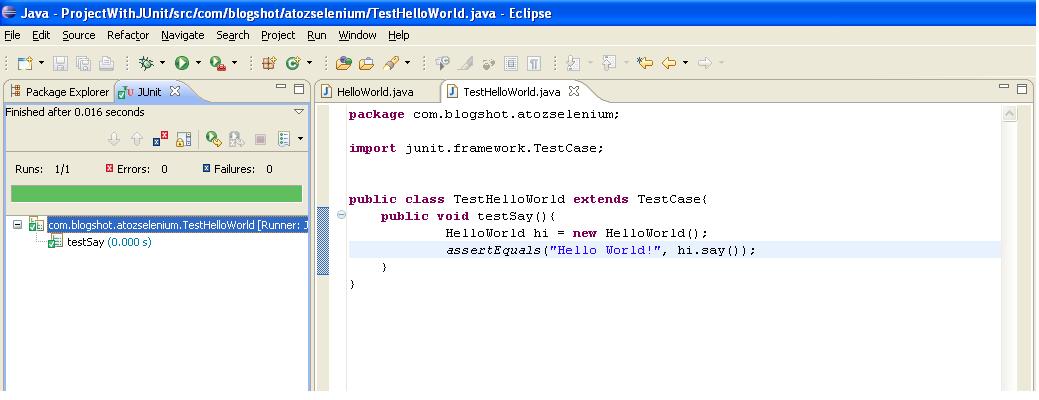
    public void testSay(){
            HelloWorld hi = new HelloWorld();
            assertEquals("Hello World!", hi.say());
    }
}

10. Now run this test case. 

Click on "Run" menu
Select "Run As" -> JUnit Test

Figure: Running JUnit Test Case

In the left side, you will see JUnit window showing a green bar. The green bar means that out test was successful.

Figure: Successful Test in JUnit

Now we want to try to make it fail. This will help show how JUnit test covers and reports different errors. Edit the assertEquals() to change the expected returm value from "Hello World!" to "Hello You!". 
When you run this JUnit test again, the bar will be red, and at the bottom of the left JUnit window you will see an explanation of what failed as illustrated in the following figure.

Figure: Failed testr in JUnit


Sunday, January 2, 2011

Simple Example to Execute JUnit tests

Simple Example to Execute JUnit tests

This section will begin with a simple example which will illustrate the basic concepts involved in testing with JUnit.

Example: SimpleTest
import junit.framework.*; //1

public class SimpleTest extends TestCase{ //2
        

public void testSimpleTest() { //3
         int result = 2;
         assertEquals((1+1), result); //4
}
}

Explanations:

1 - This requires to execute our junit test case.
2 -  We are extending JUnit TestCase class to run our test cases.
3 - This is one of the tests included within this "TestCase" class. Here we have added only one test method, we can add as many methods as we need.
4 - This simple test tests whether 1+1 is equal to the value of "result". This is just an extremely simple example.

To execute this programe:

1. Create a folder called JUnitTests under any of the drive.
2. Copy the above example into your favorite test editor and save it as SimpleTest.java
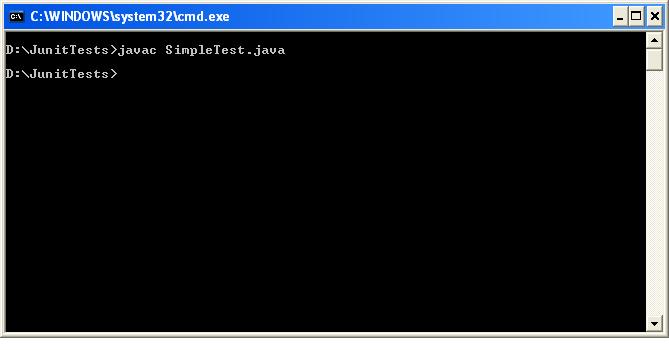
3. Comple the SimpleTest.java file

Figure: Comiling SimpleTest.java
 4. Now we want to try this test out; there are three possible user interfaces for the JUnit TestRunner:

  • TestUI: Provides text-based output to stdout
  • AwtUI: Provides GUI-based output using AWT (Abstract Window Toolkit) from Java
  • SwingUI: Provides GUI-based output using the Swing graphical user interface component kit from Java.
To select an interface execute the following command sequence.

For example if we wanted text based output for our TestCase we would issue command sequence as follows:

java junit.textui.TestRunner SimpleTest

Compile the file and then try this, you should see some output similar to this:

Figure: JUnit Test Case - Pass

The above figure indicates that our test case has been passed, no failures have occurred.

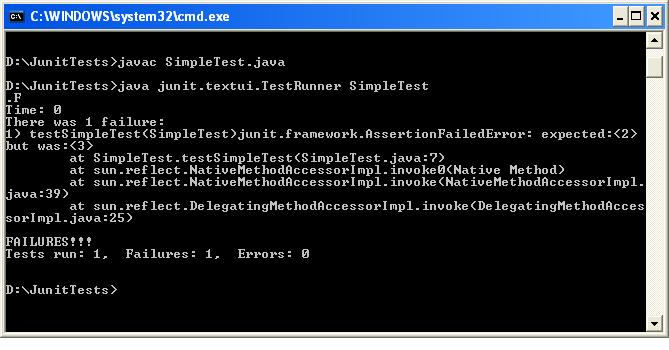
Now, change the value of "result" in the example to something other than 2, recompile the file and run the test again, you should see output similar to this.

Figure: JUnit Test Case -Fail
If this was a real program we would have fix the error and recompile and re-test.

You should now begin to have an idea how to go about setting up a simple test in junit.

Installing JUnit

Installing JUnit


1. JUnit is available at http://www.junit.org/. Go ahead and click the "Download JUnit" link shown in the following figure.

Figure: Downlond Link for JUnit

2. For the purpose of this tutorial, download junit-4.8.1.zip file into C drive. Unzip the junit-<version-number>.zip file into the root of your C drive (C:\). This creates a folder called C:\\junit<version-number>. To keep the tutorial simple, go ahead and rename the C:\Junitx.x folder to C:\Junit.

Figure: JUnit Folder
3. Now you have extracted JUnit, you need to add Junit.jar to your classpath. This enables the Java compiler to resolve where and what JUnit is.

In Windows,
  • Right click on "My Computer", select "Properties"
  • In "System Properties" form, click on "Advanced" tab
  • Click on "Environment Variable"
  • Double-click CLASSPATH and then enter the new value Ex: C:\JUnit\junit.4.81.jar
  • If you already have a setting in your CLASSPATH, make sure that you append the junit path by separating the new path with a semicolon.
Figure: Setting your CLASSPATH in Windows
 That's it. Now you are ready to execute your junit test cases.

<<Previous Next>>