
Using JUnit With Eclipse IDE:
1. Run Eclipse IDE.
2. Create a new workspace project, click File -> New -> Project, then choose Java and click "Next" button. Type in a project name -- for example, ProjectWithJUnit
3. Click Finish. The new project will be generated in your Eclipse IDE.
4. Let's configure our Eclipse IDE, so it will add JUnit library to the build path. Click on Project->Properties, select Java Build Path, Libraries, clcik Add External JARs and browse to directory where your JUnit is stored. Pick junit.jar and click Open.
You will see that JUnit will appear on your screen in the list of libraries. By clicking Okay you will force Eclipse to rebuild all build paths.
We are ready to start developing our first Junit test "Hello World" in Eclipse IDE. We will write a Junit test cases for "HelloWorld" class.
5. Create a package called "com.blogshot.atozselenium". Right click on the src (source folder), select New -> Package. Name it as "com.blogshot.atozselenium"
6. To create a "HelloWorld" class, right click on the project "ProjectWithJunit" title, slect New -> Class. Enter the class name as HelloWorld. Click on "Finish" button.
public class HelloWorld{
public String say(){
return("Hello World");
}
}
Your Eclipse IDE HelloWorld class should look like this:
 |
Figure: "HelloWorld" class in Eclipse IDE.
8.Create a JUnit Test Case.
a. Right click on the project
b. Select New -> JUnit Test Case.
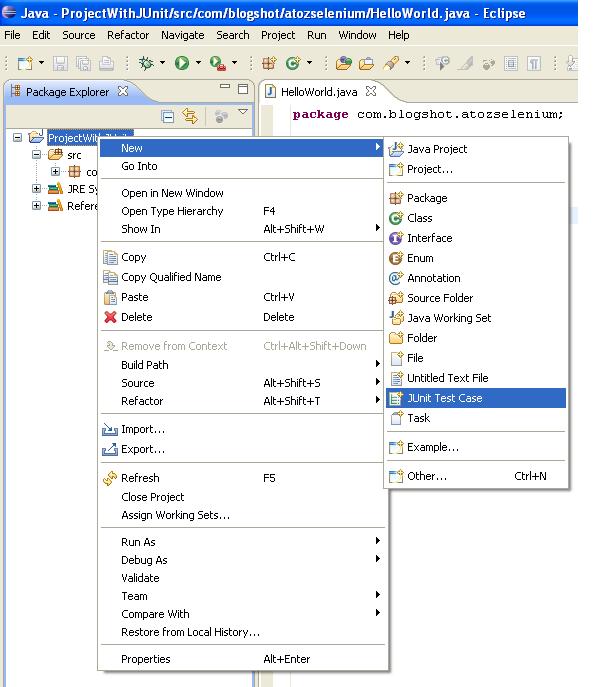 | |
| Figure: Creating JUnit Test Case |
c. In JUnit Test Case form, select Package, by clicking on the "Browse" button.
d. Enter name as TestHelloWorld
e. Click on "Finish" button
 | ||
| Figure: JUnit Test Case |
9. Modify the JUnit Test Case as follows
package com.blogshot.atozselenium;
import junit.framework.TestCase;
public class TestHelloWorld extends TestCase{
public void testSay(){
HelloWorld hi = new HelloWorld();
assertEquals("Hello World!", hi.say());
}
}
import junit.framework.TestCase;
public class TestHelloWorld extends TestCase{
public void testSay(){
HelloWorld hi = new HelloWorld();
assertEquals("Hello World!", hi.say());
}
}
10. Now run this test case.
Click on "Run" menu
Select "Run As" -> JUnit Test
 | ||
| Figure: Running JUnit Test Case |
In the left side, you will see JUnit window showing a green bar. The green bar means that out test was successful.
|
| Figure: Successful Test in JUnit |
Now we want to try to make it fail. This will help show how JUnit test covers and reports different errors. Edit the assertEquals() to change the expected returm value from "Hello World!" to "Hello You!".
When you run this JUnit test again, the bar will be red, and at the bottom of the left JUnit window you will see an explanation of what failed as illustrated in the following figure.
 |
| Figure: Failed testr in JUnit |