Monday, January 24, 2011

Building Test Suite in Selenium IDE

Test Suite:

A test suite is a collection of test cases which is displayed in the leftmost pane in the IDE. The test suite pane can be manually opened or closed via selecting a small dot halfway down the right of the pane (whic is the left edge of the entire Selenium-IDE window if the pane is closed).

The test suite pane will be automatically opened when an existing test suite is opened or when the user selects the New Test Case item from the File menu. In the later case, the new test case will appear immediately below.

Creating Test Cases:

Before creating a test cases, login to following application and click through the links http://demo.actitime.com/

Now create a test case. To create a test case,
  1. Open Selenium IDE
  2. Go to File menu > New Test Case
  3. Click on "Record" button
    • Open http://demo.actitime.com/
    • Enter Username as "user"
    • Enter Password as "user"
    • Click on "Login" button
    • Once you enter into the application, right click on the firefox box (within the application and select "assertTitle actiTIME - Enter Time-Track"
    • Click on "Stop Recording" button 
  4. Now to save a test case, select File > Save Test Case
  5. Save this test case with name "01_Login.html" into C:\SIDE folder (or any folder you want)
  6. You can debug/verify this test case, by running it.
Similarly record some test cases by clicking on "Tasks" and "Reports" link and assert the page. Save those test cases as "02_Tasks.html" and 03_Reports.html"

Creating a Test Suite:

To create a test suite in Selenium IDE
  1. Go to File menu > New Test Suite
  2. To add the test cases: Go to File > Add Test Case
  3. Navigate to the location of your test case (in our case C:\SIDE)
  4. Select 01_Login.html, click on "Add"
  5. Repeat steps 2-4 for more test cases
  6. To save your test suite, select File > Save Test Suite and name it as ActiTimeTestSuite.html
Your test suite should look like this.

Figure: Test Suite in Selenium IDE


Installing AutoIt

Installing AutoIt

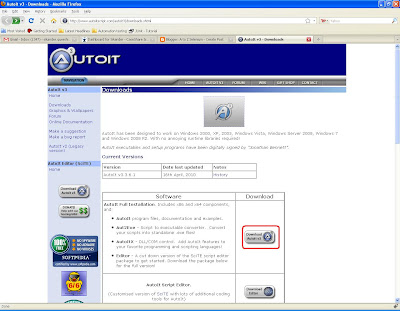
1. Goto following site - http://www.autoitscript.com/autoit3/downloads.shtml

2. Click on the highlighted link shown in the figure and save to your desktop.

Figure: AutoIt down loader link

3. You are ready to start installing AutoIt. Double click on the AutoIt installer file you downloaded. This will begin the installation process.

4. The first window that appears is the welcome screen for the AutoIt installer. This provides you with some basic information about version of AutoIt that you are installing. Click the Next > button when you are ready to continue.

5. The next screen is the licensing agreement. Read through it carefully to ensure that you agree with it. When you are finished reading it, click on I Agree to continue.

6. In the third screen, you are provided with a couple of options. The window is asking you what you want to happen when you double click on a file that has a.au3 extension. Files with .au3 extension are typically scripts written in AutoIt. If you select Run the script, the script dile you have just double clicked will run the contents of the script. If you select Edit the script, the file will open up in your default AutoIt editor.

Once you have decided on the option you would like to use, select it and click on the "Next" button.

7. Next screen will ask you to select "Choose Components". Select "Full" and click on "Next" button.

8. The next window prompts you for a location to install "AutoIt". By default, it selects C:\Program Files\AutoIt3. If you would like to install it somewhere else, you can try it. Once you decide the location of AutoIt, click the Install button to begin the installation.

9. While AutoIt is installing you will see a progress bar indicating how far along the AutoIt installation has progressed.

10. Once the installer has made all of the changed, you will see the final window telling you that AutoIt has successfully installed. Click Finish to complete the installation process.