Friday, May 6, 2011

Selenium Frameworks

Followings are the various automation frameworks available which can be used with Selenium Web Automation tool depending on the requirements


1. Keyword Driven Framework
2. Data Driven Framework
3. SAJ (Selenium Ant JUnit) framewrok
4. SAT (Selenium Ant TestNG) framework
5. SIMPLIUM 
6. Tellrium
7. Robot Framework

Monday, May 2, 2011

Differences between HTTP and HTTPS protocols


HTTP:
  • HTTP stands for Hyper Text Transfer Protocol. 
  • HTTP is a system for transmitting and receiving information across the internet.
  • HTTP is the set of rules for transferring files (test, graphic images, sound, video and other multimedia files) on the World Wide Web.
  • HTTP functions as a request-response protocol in the client-server computing model.
  • In HTTP, a web browser, for example acts as a client, while an application running on a computer hosting a web site functions as a server. The client submits an HTTP request message to the server. The server, which stores content, or provides resources, such as HTML files, or performs other functions on behalf of the client, returns a response message to the client. A response contains completion status information about the request and any content requested by the client in its message body.
  • HTTP is an Application Layer protocol designed within the framework of the Internet Protocol Suite
HTTPS:

HTTPS (Hypertext Transfer Protocol Secure) is a combination of the HyperText Transfer Protocol with the SSL (Secure Socket Layer)/TLS protocol to provide encrypted communication and secure identification of a network web server.

Differences Between HTTP and HTTPS Protocols:
  • HTTPS connects on port 443, while HTTP is on port 80
  • HTTPS encrypts the data sent and received with SSL, while HTTP sends it all as plain text

Monday, March 21, 2011

Date Function in Java

Getting the current Date-time:
public String getCuurentDateTime(){
DateFormat dateFormat = new SimpleDateFormat("yyyy/MM/dd HH:mm:ss");
Calendar cal = Calendar.getInstance();
String cal2 = dateFormat.format(cal.getTime());
return cal2;

Monday, March 14, 2011

Finding the port number of a SQL Server


There are a couple of ways of finding this information.
1) Using the GUI: In SQL Server 2000, you can use the Server Network Utility and in SQL Server 2005, you can use the SQL Server Configuration Manager.  Look under SQL Server 2005 Network Configuration and look at the TCP port for the TCP/IP protocol.
2)  Check the error log.  You will see an entry like: “Server is listening on [ 'any' <ipv4> 1433].”  The last 4 numbers denote the TCP/IP port number that is being used by that particular instance of SQL Server.
3)  Registry entry: HKLM\Software\Microsoft\MSSQLServer\MSSQLServer\SuperSocketNetLib\TCP
and you will see TCPPort as one of the entries and it’s value represents the port number for that instance.  In case you are using a named instance, then the registry entry will be: HKLM\Software\Microsoft\Microsoft SQL Server\<name of the instance>\MSSQLServer\SuperSocketNetLib\TCP
4) Using the extended stored procedure xp_regread, you can find out the value of the TcpPort by using SQL.  Example:
DECLARE @tcp_port nvarchar(5)
EXEC xp_regread
@rootkey    =    'HKEY_LOCAL_MACHINE',
@key        =    'SOFTWARE\MICROSOFT\MSSQLSERVER\MSSQLSERVER\SUPERSOCKETNETLIB\TCP',
@value_name    =    'TcpPort',
@value        =    @tcp_port OUTPUT
select @tcp_port

Wednesday, March 9, 2011

Data Driven Test Using JUnit


Following steps will guide you how to do data driven tests by using JUnit.

1. Create a Java Project

2. Create a JUnit Test case called "DataDrivenTestUsingJUnit"

3. Add junit and selenium-server jar files to build path

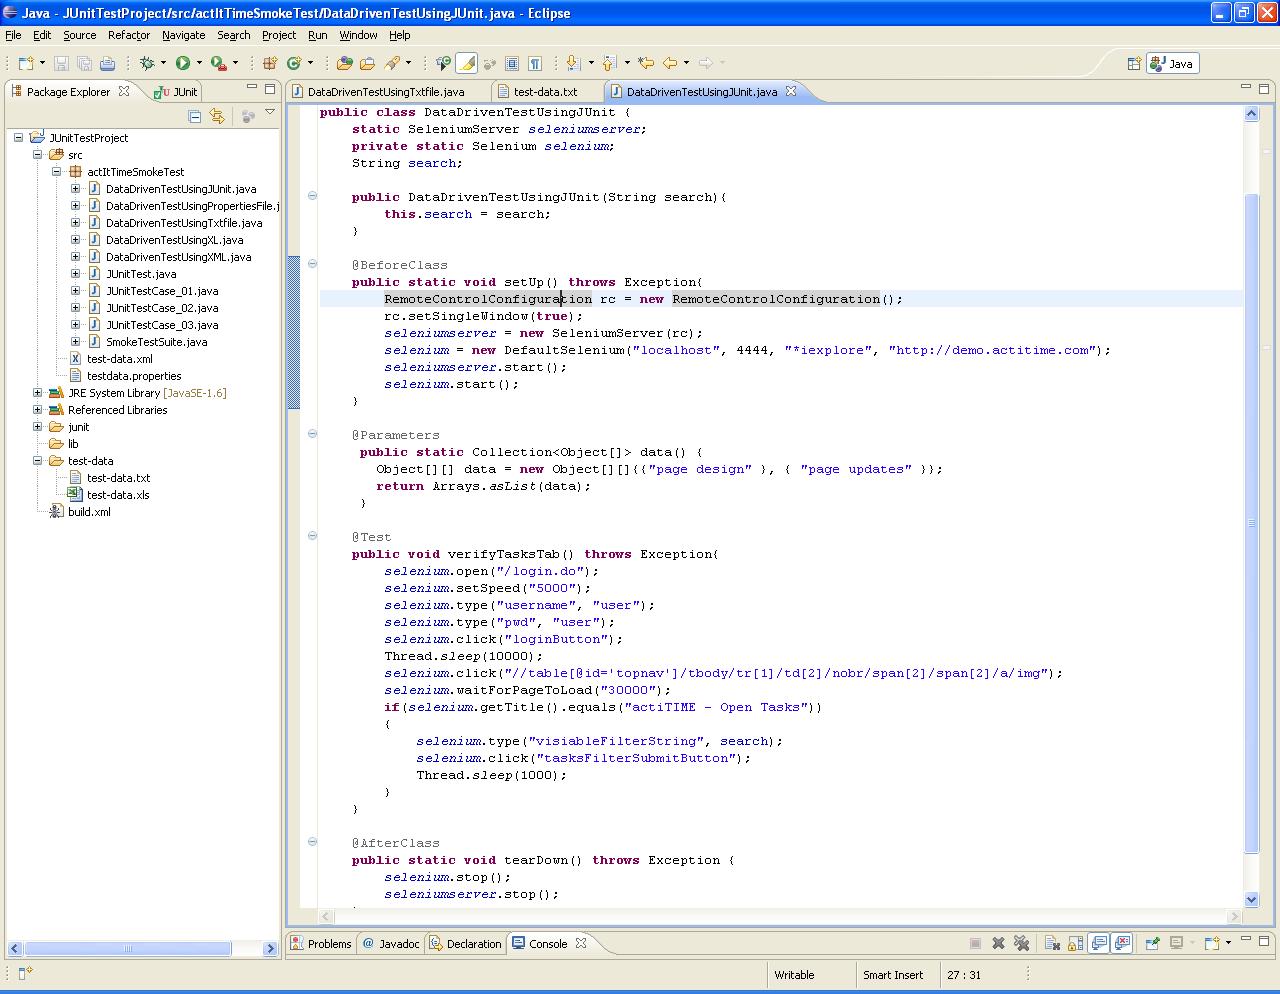
4. Copy the following script and run the test
Figure: Data Driven Test using JUnit

Data Driven Test Using Text file


Following steps will guide you how to do data driven tests by using Text file.

1. Create a Java Project

2. Create a JUnit Test case called "DataDrivenTestUsingTxtfile"

3. Add junit and selenium-server jar files to build path

4. Create a folder called "test-data"

5. Create a text file called test-data.txt" under test-data folder

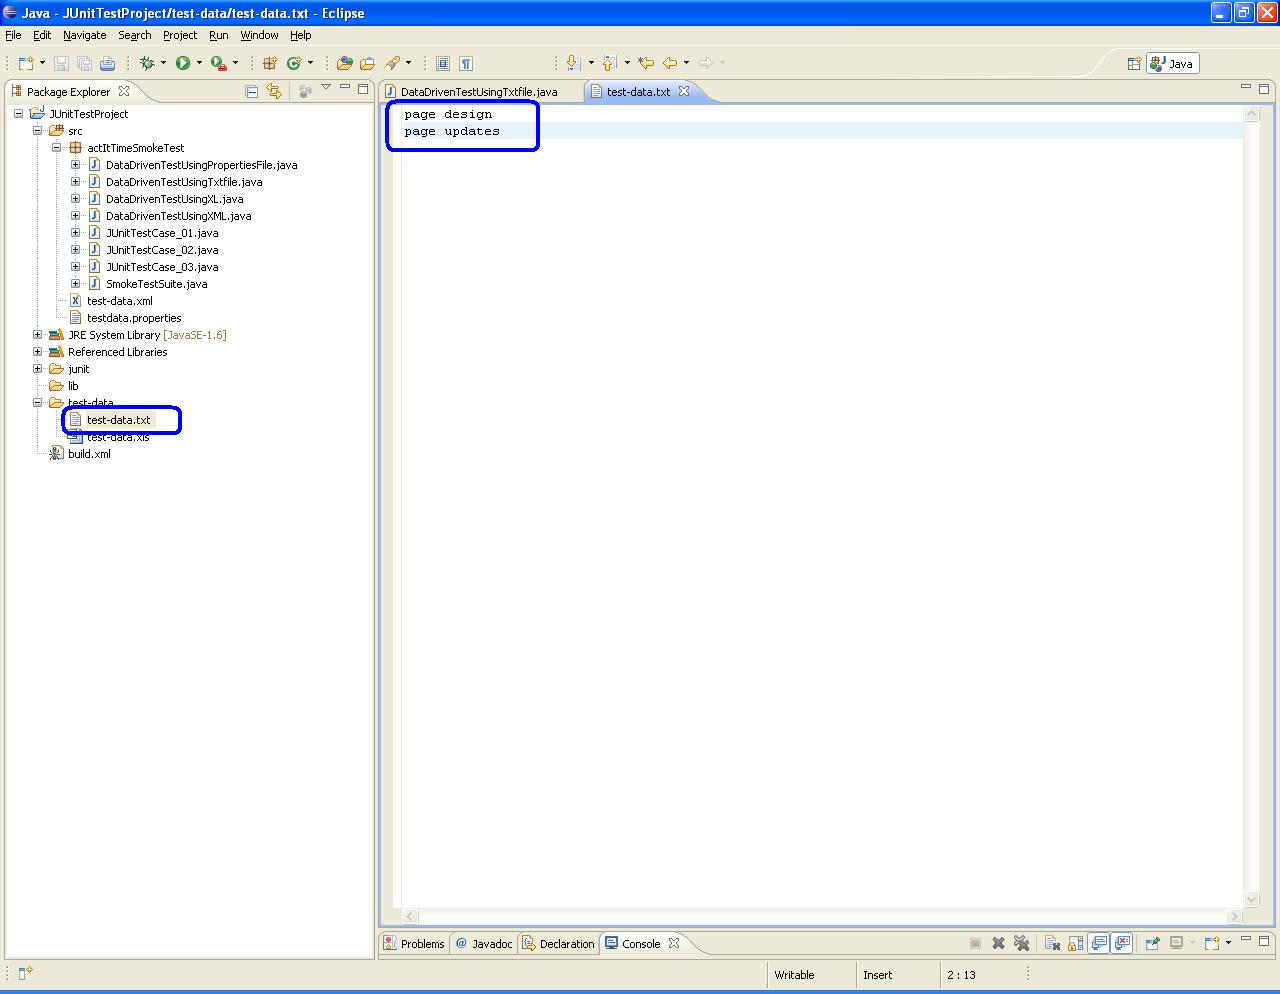
6. Add followings in test-data.txt file - page design, page updates (one below the other as shown in the following figure)
Figure: Test data in Text file
7. Copy the following code and run the test script
Figure: Data Driven Test Using Text file

Data Driven Test Using Excel file


Following steps will guide you how to do data driven tests by using Excel file.

1. Create a Java Project

2. Create a JUnit Test case called "DataDrivenTestUsingXL"

3. Add junit and selenium-server jar files to build path

4. Create a folder called "test-data"

5. Create a excel file called test-data.xls"

6. Under "Sheet1" add the test data as shown below
Figure: Test data in Excel file
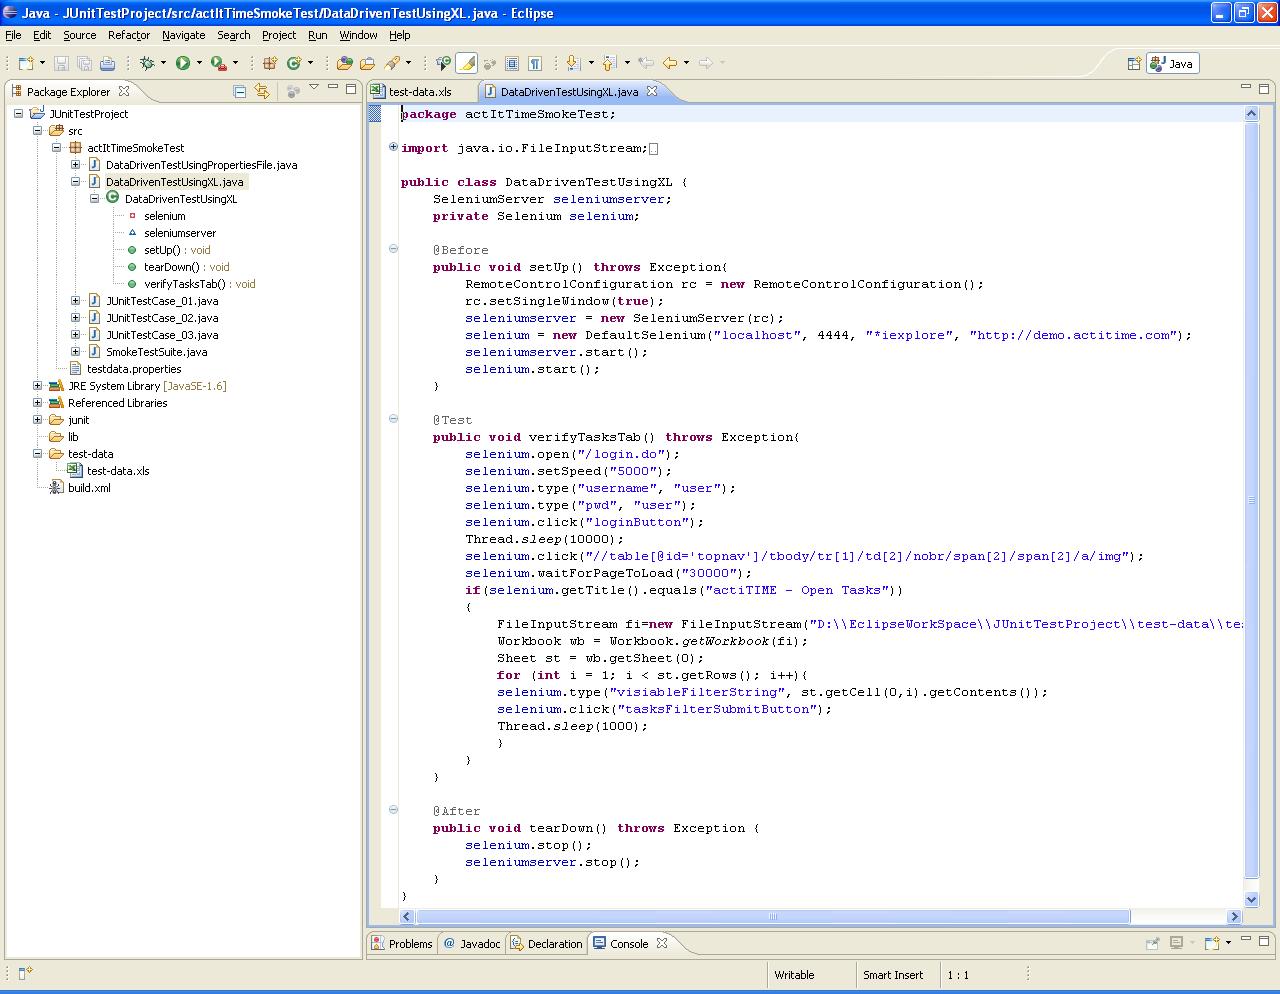
7. Copy the following code into your junit test file and run
Figure: Data driven test using excel file


Data Driven Test Using Properties file

Following steps will guide you how to do data driven tests by using .properties file.

1. Create a Java Project

2. Create a JUnit Test case

3. Add junit and selenium-server jar files to build path

4. Now right click on the source folder and select New ->File

5. Enter File name as "testdata.properties" and "Finish" button
Figure: Creating properties file
6. Now, double click on "testdata.properties" file and enter the following data - Filter_Task=page design,page updates
Figure: Test data in properties file
7. Now copy the below code from the following figure and run your JUnit test case
Figure: Data Driven Test Using Properties File
Reference: http://kirankanumuri.blogspot.com/2010/10/how-to-do-data-driven-testing.html

Monday, March 7, 2011

Generating JUnit Report

1. Select File menu and click on "Export" option

Figure: Export window
2. Expand "General" node and select "Ant Buildfiles", click on "Next" button

3. Select the project (let all default options), click on "Finish" button
Figure: Ant Buildfiles
4. build.xml file should be created under project folder

5. Now we need to add junit jar file in Ant's "Global Entires"

6. Select "Window" menu, click on "Preferences"

7. In "Preferences" window, expand "Ant" root node, click on "Runtime"

8. Click on "Classpath" tab, expand "Global Entires" 

9. Click on "Add External JARs" button


10. Navigate to your "eclipse" directory (where eclipse is installed). Select "plugins ->org.junit_3.8.2.v3_8_2_v20100427-1100" directory. Select junit.jar file

11. Now right click on build.xml file and select Run As -> Ant Build.."

12. In "Edit Configuration and launch" window, select "build", "SmokeTestSuite" and "junitreprot" checkboxes and click on "Run" button
Figure: Edit Configuration


13. All your test scripts will run and finally report will be generated under the same project directory under "junit" folder

14. Click on "index.html", you will see the report 

Friday, March 4, 2011

Creating Selenium RC - JUnit Test Suite using Eclipse IDE

1. Create JUnit test cases as illustrated here

2. To create a JUnit test suite, right click on the project select New -> Class

3. Enter the class name as SmokeTestSuite and click on "Finish" button

4. Copy the following code and paste in the above class

package actItTimeSmokeTest;

import org.junit.runner.RunWith;
import org.junit.runners.Suite;

@RunWith(Suite.class)
@Suite.SuiteClasses({JUnitTestCase_01.class, JUnitTestCase_02.class, JUnitTestCase_03.class})
public class SmokeTestSuite {
}

5. To run the test suite, right click on the SmokeTestSuite file and select Run As -> JUnit Test

6. The test suite file will run all the 3 tests and gives the results. Following is the JUnit test result for test suite
Figure: JUnit Test Suite Results

Thursday, March 3, 2011

Running a Selenium RC - JUnit Test Case in Eclipse IDE

1. Create a JUnit test case as illustrated here

2. Select the test case which you want to run individually (.java file), right click on it.

3. Select Run As -> JUnit Test (see below figure)
Figure: Running JUnit Test Case
4. The test results can be viewed under JUnit window (see below screen shot)
Figure: JUnit Test Result

Creating a Selenium RC - JUnit Test Case in Eclipse IDE

1. Open Eclipse IDE
2. Create a project
3. Create a package
4. Add JUnit, selenium-server jar files to build path
5. Right click on the project and select New -> JUnit Test Case (as shown in following figure)
Figure: JUnit Test case
6. In the "New JUnit Test Case" window, enter "Source folder", "Package" and "Name". Here name is java class name.
Figure: New JUnit Test Case
7. Now, copy and paste the following code into your test case
Figure: JUnitTestCase_01
8. Similarly, create the following test cases
Figure: JUnitTestCase_02
Figure: JUnitTestCase_03

Wednesday, March 2, 2011

Adding JUnit Library to Eclipse Build Path

1. Download JUnit jar file

2. Open Eclipse IDE

3. Create a Java Project if you have not already created (Refer here)

4. Right click on the project and select "Properties"

5. In "Properties" window, select "Java Build Path" from right side tree

6. Click on "Libraries" tab

7. Click on "Add External Jars" button (See the below figure)
Figure: Build Path
8. Move to the location where junitx.jar file is located and add, click on "OK" button

9. A new node called "Referenced Libraries" must be created and JUnit jar file must be added into that as shown below
Figure: JUnit jar fiel ubder Referenced Libraries
Now, we can write JUnit test case.

Monday, February 28, 2011

Creating a Java Package in Eclipse IDE

1. Run Eclipse IDE

2. Create a new Java Project (Refer here)

3. Right click on "src", select New -> Package
Figure: New Package in Eclipse
3. Enter package name and click on "Finish" button
Figure: Java Package Wizard
4. Now, Java package has been created
Figure: Java Package

Creating a New Java Project in Eclipse IDE

1. Open Eclipse IDE

2. Click on File -> New -> Java Project as shown in the following figure
Figure: Creating Java Project
3. Enter "Project name" and click on "Finish" button
Figure: Eclipse "New Java Project" page
That's it!! New project has been created in Eclipse IDE

Thursday, February 24, 2011

Java Class


What is a Class:
  • In object-oriented programming, a class is a construct that is used as a blueprint (or template) to create objects of that class. This blueprint describes the state and behavior that the objects of the class all share. An object of a given class is called an instance of the class. The class that contains (and was used to create) that instance can be considered as the typeof that object, e.g. an object instance of the "Fruit" class would be of the type "Fruit"
  • A class is a representation for a conceptual grouping of similar terms. For example, a computer could be represented as a class which would have many subclasses such as personal computers, mainframes, workstations, etc.
  • Java classes contain fields and methods.
  • A class is simply a representation of a type of object; think of it as a blueprint that describes the object. Just as a single blueprint can be used to build multiple buildings, a class can be used to create multiple copies of an object.

Java Class Syntax:


Following is the syntax of Java class.


[public] class class-name [inheritance-specification] {

    [field-list;]
    [constructor-list;]
    [method-list;]
}

Types of Java Class:

Java possesses five different types of class construct and if one is to develop quality software it is important to know where to use each type. It can sometimes be difficult to know exactly which variant should be used in a particular situation as often more than one will fit. To make matters worse there are generally many ways that a particular problem can be solved. This article will discuss the various class types and give indicators as to when they should be used.

Top Level Classes

A top level class is the one that all Java developers will be familiar with as without it one can not develop software at all. A typical top level class can be seen below:
package example; public class Foo {     public static void main(String[] args) {     } }
This is the simplest, runnable, top level class that could be developed and lives in a file called Foo.java. Without actually checking I would guess that 90% or more classes are top level. Each class encapsulates some data or functionality that logically belongs on its own. If in doubt about which type of class to use a top level class is probably the safest choice as it will be easier to correct any mistakes later.


Static Member Classes

Static member classes (sometimes called static inner classes although they aren't strictly inner) are the first and most common type of nested class. A nested class is defined inside the body of an enclosing class and should only be present to assist the enclosing class. There is no limit to the depth of the class nesting but it is uncommon to see more than one level and very uncommon to see more than two (in more years than I care to think about developing Java I have never seen a triple nested class).
A very simple static member class is shown below. As with the top level class this is as simple as it can be and is just to show the syntax:
package example;
public class Nest {
    
private static class Nested {
        
    }    
}
Static member classes can be thought of as regular classes that are simply defined inside another class. They have complete access to all the enclosing classes static member variables and functions. All the rules regarding accessibility of the member class are the same as for any other static member of the class. So, for instance, if it's private only the enclosing class can access it.
package example;
public class Nest {
    
    
private static String var = "foo";
    
    
private static class Nested {
        
public Nested() {
            
var = "bar";
        
}
    }    
}
The most common use of static member classes is as an auxiliary class that only makes sense when used in conjunction with its enclosing class. An example of this is in the Java library is in he Map interface which includes the Map.Entry static interface. Although this example uses interfaces rather than classes the intention is exactly the same. Interfaces are used in order to make it easier to switch to a different implementation at a later date.

Non-Static Inner Classes

There is only one small difference between the declaration of a static and non-static member class but in terms of functionality the difference is huge. To define a non-static inner class use the same syntax as for static member classes but don't include the static key word. For Example:
package example;
public class Nest {
    
    
private String var = "foo";
    
    
private class Nested {
        
public Nested() {
            
var = "bar";
        
}
    }    
}
The most important difference between static member classes and non-static inner classes can be seen in this example. Each instance of the inner class is implicitly associated with an instance of its enclosing class. This allows the inner class to directly access the non-static member variables and functions of its enclosing instance. Since a non-static inner class maintains a reference to its enclosing class an instance of a non-static inner class can not be created unless there is an instance of the enclosing class. Instances of the inner class maintain a reference to their enclosing instance which is assigned automatically upon object creation. If your member class doesn't require access to the enclosing instance make it static to save resources.
Non-static inner classes are useful as adaptors that allow a class to appear to be something else. For example one can view the keys in a Map as a Set. This is handled by the creation of an inner class that implements the Set interface which is then returned to the user. Iterators are a similar example. When one requests an Iterator from a collection what one receives is an inner class that implements the iterator interface. The class itself needs to be non-static so that it can access the contents of the enclosing instance.
Due to the restriction that a non-static inner class can't exist without an enclosing instance it is uncommon to see non-static inner classes that aren't private or at least package protected. Static member classes, in contrast, are frequently public.

Anonymous Classes

Anonymous classes are one of the strangest constructs in the Java language and many new developers have trouble getting their head around exactly what is happening. Once anonymous classes are properly understood, however, they open a world of possibilities for quickly solving simple routine problems. The most common use of anonymous classes is with GUI development where they are attached as listeners to the various widgets. Probably the second most common use of anonymous classes is as filters and comparators. The example below shows a simple comparator:
package example;
import java.util.Collections;import java.util.Comparator;import java.util.LinkedList;import java.util.List;
public class Comp {
    
    
public Comp() {
        
List<String> foo = new LinkedList<String>();
        Collections.sort
( foo, new Comparator<String>() {
            
public int compare( String s1, String s2 ) {
                
return s1.compareTo( s2 );
            
}
        })
;
    
}
}
In the above example the anonymous class is an implementation of the Comparator interface that is used to order the List foo. The class is anonymous because it has no name and can't be referenced. In this situation the class is said to be used as a function object.
Anonymous classes can also be process objects such as Runnables or Threads and they can also be used in static factory methods where we want to view one object as if it is another by wrapping it in a class that implements a different interface.
Anonymous classes are a very powerful tool in the developers arsenal but it is important that they aren't over used or overly complex. A long anonymous class can quickly clutter a top level class making it difficult to see where one ends and the other begins. Generally speaking try and keep anonymous classes to a maximum of one screens worth of code or about 40 lines.

Local Classes

Local classes are by far the most uncommon class type to be used in the Java language. In fact I don't actually remember ever seeing one. For those interested an example is show below:
package example;
public class Enclosing {
    
    
public Enclosing() {
        
class Local {
            
public Local() {
                
System.out.println( "In local class...");
            
}
        }
        
new Local();
    
}
}
A local class is declared inside a method body (member classes are declared inside the class). It is only accessible to the method it is declared in which makes local classes less generally useful than non-static inner classes. If used in a non-static setting they acquire a reference to their enclosing class. There are some uses for local classes in situations where there isn't an interface already defined so an anonymous class would be difficult or impossible to use.